An exciting adventure for React developers is when they connect their React application with redux and when you have made this far in reading about React, that means you are on the way to explore the out of the box concept of how you can manage global states in your application. This article will be helpful for the React developers in integrating React Application with Redux.
Though React gives us the ability to manage state for our components, the dependency of the parent components on the child components and state management between two components becomes complicated, with the increasing size of the application. To resolve this issue we have a 3rd party library called Redux which gives us all these wonderful features we need for global state management.
I know some of you might have the questions in your mind like what is Redux? Why is there A need of Redux? Is Redux a part of React? How it works? and so many more because most of you including me had the same questions when I first heard the term. Let’s now find out, what actually it is.
Redux is a 3rd party JavaScript library which is used for the global state management for your application. It can be used with any front-end JavaScript Framework like React, Angular, Vue, Ember and many more but most often it is used with React.
It provides us a way to manage our state at one place with the help of the concepts like Reducer, Action and Store.
So, is Redux Hard?
Well, if you don’t understand it carefully then it can be very complex and confusing for you to use such an important concept. However, the concept is not that hard if explained and understood nicely.
How Redux Works
The main idea of Redux is to have a central or global store where you can store all of your states and can get access to these states at any point of time in any component.
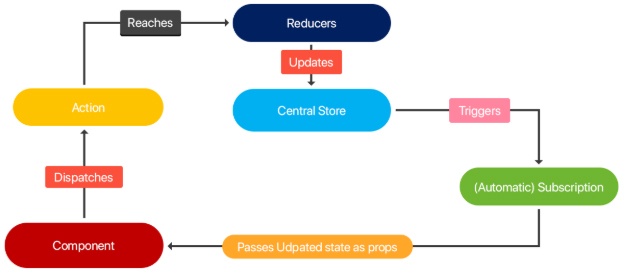
Redux Flow
So here we have a Global Store which is a JavaScript Object and that stores your Application States. Now Component can effect and can get access to these state and to make this happen we have Action for this.
Action is just a packet of information which holds a type (like: add, remove, etc..) and carry info called payload (like: values, errors etc.. ). Actions doesn’t hold any Logic in it, these are just the carriers. Actions are usually dispatched from the Component.
Actions |

Action doesn’t have the direct communication with the Store so the bridge between Action and the Store is a Reducer, where the actual state updation takes place.
When Action reaches the Reducer and since Action has a type, Reducer will check, what type of action it is and then we can create a functionality for that type of action.
Reducer is just a pure function which takes old state and action as an argument which after checking the type of action returns an updated state which is actually a new JavaScript object since the object in JavaScript is reference type so every time an action is dispatched a new copy of state is being created inside Reducer so that it cannot mutate the old state.
Reducers are synchronous in behaviour. So we cannot create any side-effects here.
Reducers |
Now, the State inside the Store is updated and every time, State gets updated the Store triggers the Subscription and here our Component can Subscribe to the updated store where State will be received as props in our components.
Yes I know..! That’s too much Theory
Okay so be ready to get your hands dirty with some actual coding. We will create a basic Reactjs project and step by step find out how easy it is to integrate Redux in our React application.
Project Setup
Now the first thing to do is to create a React Project so that we can use our Redux library there. We can do this by using create-react-app.
Go to your terminal and hit the commands:

Now your sample React project will be up and running on localhost:3000
So this is a simple React application setup where you will have all the basic dependencies for your React app. To connect your React component with the Redux Store we need to install some libraries and those libraries are:
- Redux | Command

- React-Redux | Command

The first command simply installs redux to our application whereas the second command installs the React-Redux library which is required to connect our react application to Redux.
With this thing in place, we have all the dependencies installed and now we will be building a very simple application where you can add subtract increase decrease and reset the state. This is a very simple application to use Redux, but it is always a great way to start with simple things to understand the complex concept like Redux.
Creating a Store and Connecting it with the component
Where do we create a store? Well for me it is always at index.js because there we have the very root component App from where we can pass on the States from the Store.
We will also be setting up the Reducer file since Store takes the Reducer as input.
Index.js file
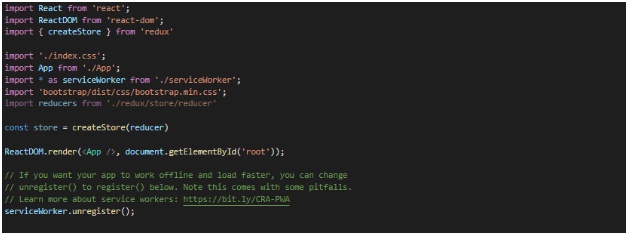
So the first thing we do here is to create Store and for that we will import
![]()
And then we will create a Store
![]()
As we need to pass reducer on createStore(), we will be creating a Reducer file where we will define our actions.
Reducer.js | Basic
Here we created a basic reducer with state which is returning the state as it is.

Now we need to connect our store to our React application and we want to get access to the state in our component so that we do something useful.
Let’s connect our Store here with the Component.
Because Redux is an independent library and we need to connect it with React, we will be importing Provider from the react-redux library inside the same index.js file.
![]()
And now we need to wrap the Root component (which is in our case) with the Provider. It allows us to pass our store which contains the state into the React component. You can pass it the same way you pass the properties in the React component.
We will pass it with the property name store and passing the information coming from our Reducer which we have also named as store.
![]()
App.js File
This file is responsible for all the UI element. On this page we will be performing our basic tasks like Increment, decrement, add, substract, reset. Now I have used bootstrap here to create some UI element but will not be discussing it in this article since this is not in the scope of our topic.

import React, { Component } from ‘react’;
import ‘./App.css’;
import { connect } from ‘react-redux’
import { Container, Card, Button,Row,Col } from ‘reactstrap’
class App extends Component {
state = {
info : ”
}
render() {
return (
{this.props.value}
);
}
}
const mapStateToProps = (state) =>{
return {
state : state
}
}
const mapDispatchToProps = (dispatch) =>{
return{
_onInc : () =>{
dispatch({
type : “ON_INCREMENT”,
value : 1
})
},
_onDec : () =>{
dispatch({
type : “ON_DECREMENT”,
value : 1
})
},
_onAdd : () =>{
dispatch({
type : “ON_ADD”,
value : 3
})
},
_onSub : () =>{
dispatch({
type : “ON_SUBTRACT”,
value : 3
})
},
_onReset : () =>{
dispatch({
type : “ON_RESET”,
value : 0
})
}
}
}
export default connect(mapStateToProps,mapDispatchToProps)(App);
So far, we don’t have access to our store directly inside the component. For this, we need to connect our component with the Store by importing connect from react-redux.
import { connect } from ‘react-redux’
connect is a method which returns a function which then takes component as an input. So in short, it’s a function that returns a higher order component and since connect is function we can pass the argument as the configuration for the component.
Basically we pass two arguments in there
- Which exact state do I want
- What action do I want to dispatch
1. mapStateToProps
Now we want to get state and for that we will declare a constant after the class declaration. Here we will map the state which is stored at store to the props
const mapStateToProps = (state) =>{
return {
value: state.value
}
}
We have called this state as props (named as value) in our application above. The state here is the same state (global state) we have defined in the reducer.
{this.props.value}
2. mapDispatchToProps
Here we can define which kind of action we can dispatch. It will receive dispatch as an argument and where it will return a JavaScript Object on which we can dispatch an action which has information like type and value (payload).
const mapDispatchToProps = (dispatch) =>{
return{
_onInc : () =>{
dispatch({
type : “ON_INCREMENT”,
value : 1
})
}
}
Similarly, we can dispatch different action with a type and value on onClick event of the button. This will also be map to a props name.
In our case we have increment, decrement, add by 3, subtract by 3 and reset. We have declared all this in the above code.
These two properties need to be passed as an argument or you can pass null if not using any of the configuration.
export default connect(mapStateToProps,mapDispatchToProps)(App);
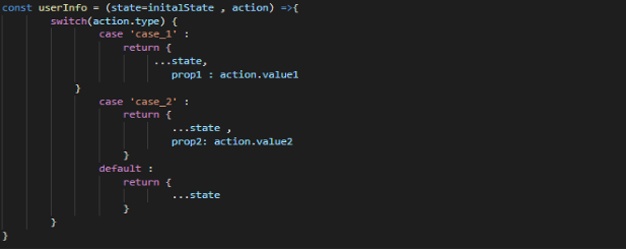
Since we are dispatching an Action with a type and value, Reducer can now check for the type of the action and will update the state accordingly.
Reducer.js File |
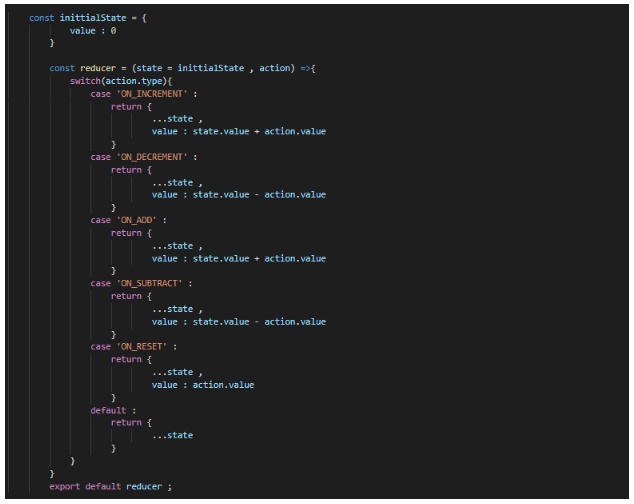
Here we have defined different cases for different actions that we are performing at the App.js file and this again can pass the updated states to the store and then store will be available to all of our component through connect (react-redux).
In the beginning Redux can be little complex to understand but at the same time this is one of the most powerful tool for React in managing your state. It gives you the extra power to develop your Application in a smarter way. So if you are looking for ReactJS development services, then consider to hire React Developer who not only hold expertise in React but also has knowledge as to how can React Applications be integrated with Redux or Firebase.
You may also want to read about “Advantages & Disadvantages of React”


